Sometimes, it's better to assign an IP address to a computer so that the router automatically assigns the IP address. Let's read this article to know how to assign static IP addresses in Windows.
Sometimes, it's better to assign an IP address to a computer so that the router automatically assigns the IP address. Let's read this article to know how to assign static IP addresses in Windows.
Typically, IP addresses for personal computers and other devices can be automatically assigned by the router using a protocol called Dynamic Host Configuration Protocol (DHCP). This is a convenient way to connect devices to the network because users do not have to configure an IP address for the new device. The disadvantage of automatically assigning IP addresses is that the device's IP address may change over time.
This is not a big deal, but in some cases, users want the device to use a static, unchanging IP address. For example, in this case:
A static IP address is an IP address that is manually configured for a device instead of being assigned by a DHCP server. It is called static because it does not change like a dynamic IP address. Static IP addresses are also sometimes called fixed IP addresses or dedicated IP addresses.
Routers, phones, tablets, desktops, laptops, and any other device that can use an IP address can be configured to have a static IP address. Assigning a static IP address to a device is not difficult, but users should choose whether to do this from the router or on the device.
How to assign a static IP address in Windows 11, 10, 8, 7, XP or Vista Picture 1
The main disadvantage that static IP addresses have over dynamic addresses is that devices must be configured manually. The examples given above involve home web servers and remote access programs that require you to set up the device by IP address and properly configure the router to communicate with that specific address.
This requires more work than plugging in the router and allowing it to provide dynamic IP addresses via DHCP. If a device is assigned an IP address, for example, 192.168.1.110, and you access another network that provides a 10.XXX address, you will not be able to connect to the static IP. Instead, the device will need to be reconfigured to use DHCP (or use a static IP that works with that new network).
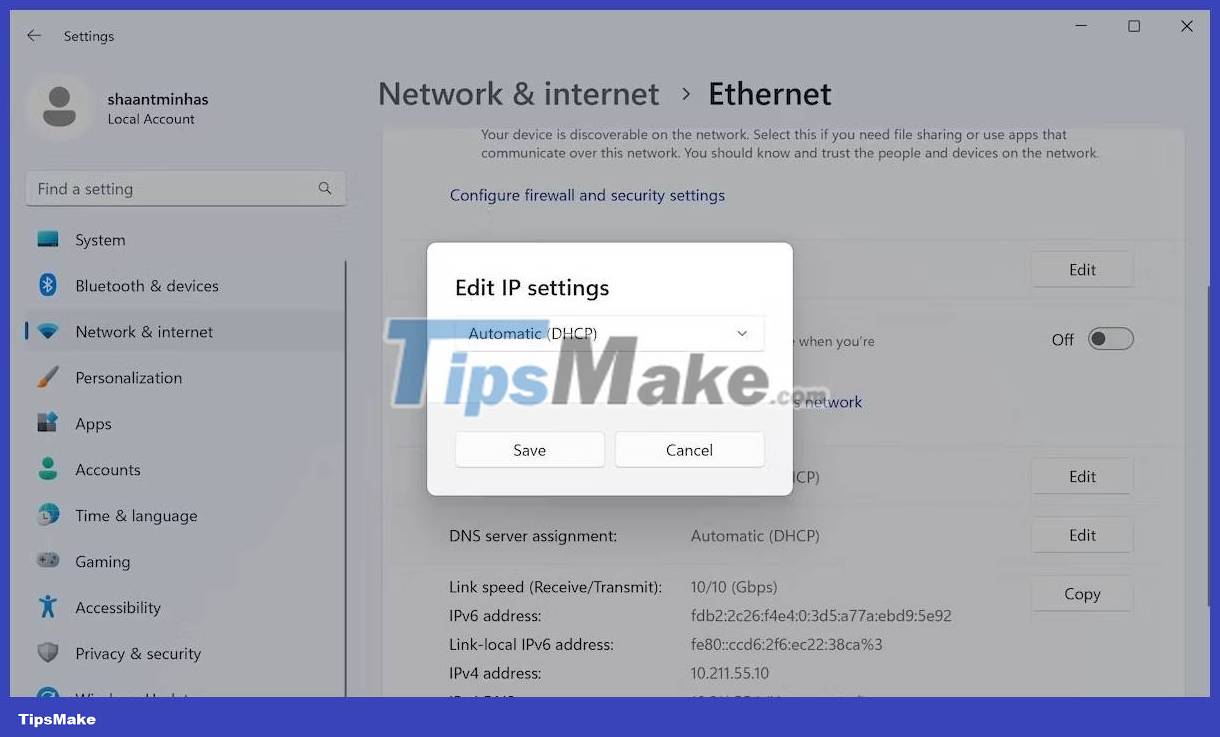
Like most things on Windows, you have multiple ways to do this. First, let's look at the simplest method, which is using Windows Settings.
Here's how you can set a static IP address using Windows Settings:
How to assign a static IP address in Windows 11, 10, 8, 7, XP or Vista Picture 2
Follow the above steps meticulously and your Windows 11 will have a new static IP address from here on out.
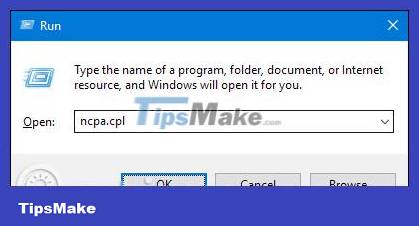
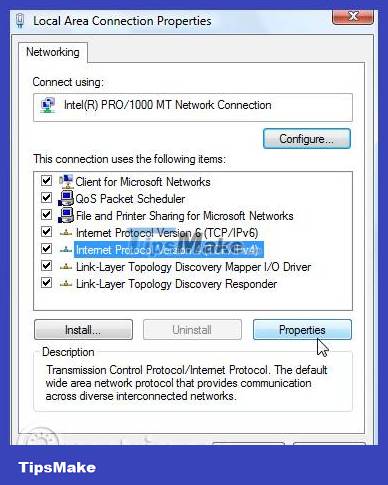
To change your computer's IP address in Windows, open the " Network Connections " window. Press Windows + R , type " ncpa.cpl " in the Run box , then press Enter .
How to assign a static IP address in Windows 11, 10, 8, 7, XP or Vista Picture 3
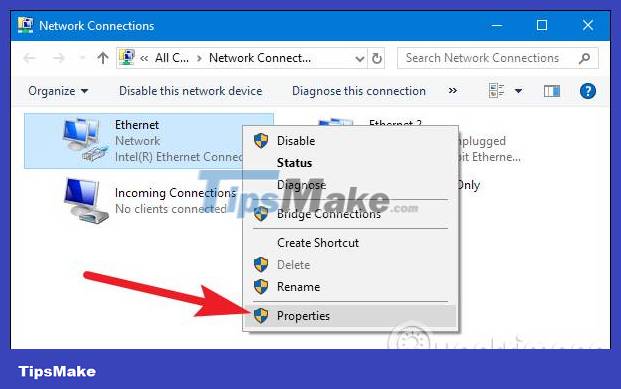
In the " Network Connections " window , right-click on the adapter you want to set a static IP address and then select the " Properties " command.
How to assign a static IP address in Windows 11, 10, 8, 7, XP or Vista Picture 4
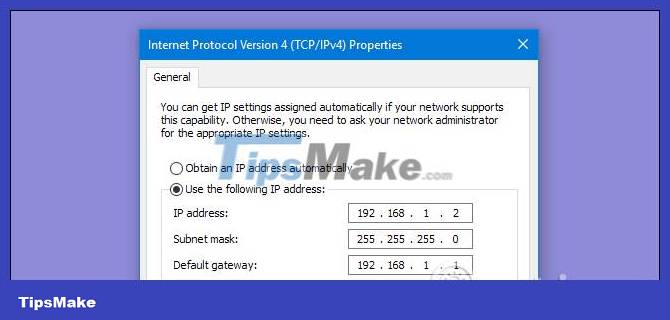
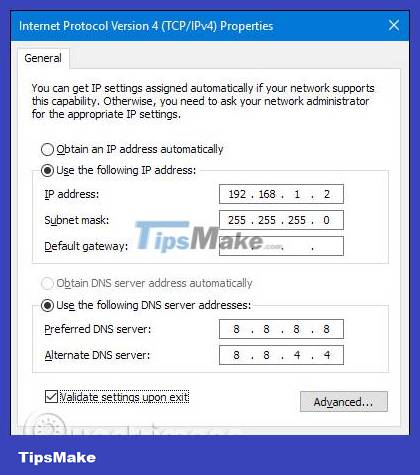
In the adapter's properties window, select " Internet Protocol Version 4 (TCP/IPv4)" and then click the " Properties " button.

How to assign a static IP address in Windows 11, 10, 8, 7, XP or Vista Picture 5
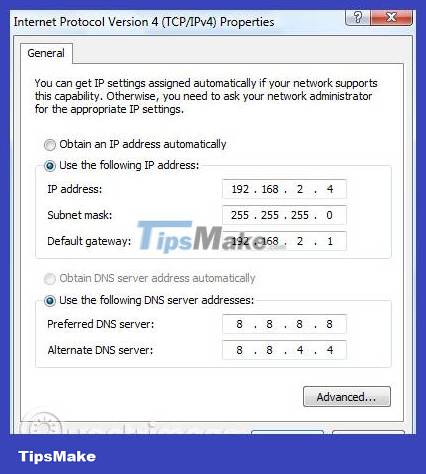
Select the " Use the following IP address " option , then type in the IP address, subnet mask and default gateway corresponding to the network settings. Next, enter the DNS server address. Finally, select the " Validate settings upon exit " option to have Windows check the new IP address and corresponding information to make sure it works properly, then click the " OK " button when done.
How to assign a static IP address in Windows 11, 10, 8, 7, XP or Vista Picture 6
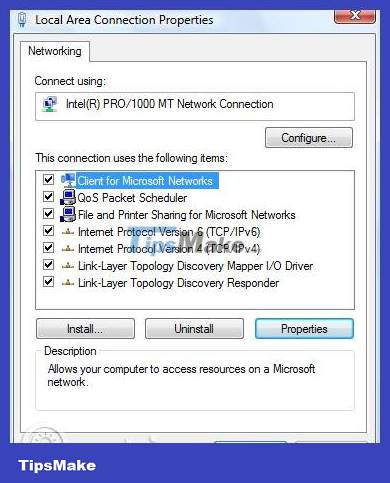
And then close the network adapter's properties window.

How to assign a static IP address in Windows 11, 10, 8, 7, XP or Vista Picture 7
Windows automatically runs network diagnostics to verify connectivity. If there are problems, Windows will provide the option to run a network troubleshooting wizard. However, if you're really having trouble and this troubleshooting wizard doesn't actually fix the error, you should check the settings and try again.
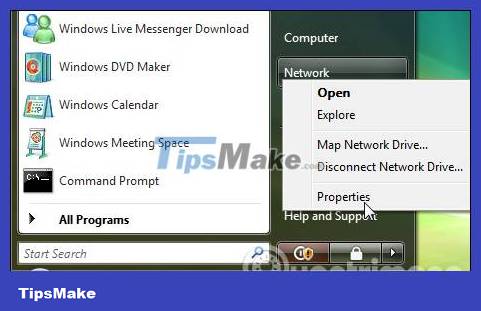
Changing the IP from DHCP to a static address in Vista is similar to other versions of Windows, but the location will be slightly different. Open the Start Menu, right-click Network, and select Properties.
How to assign a static IP address in Windows 11, 10, 8, 7, XP or Vista Picture 8
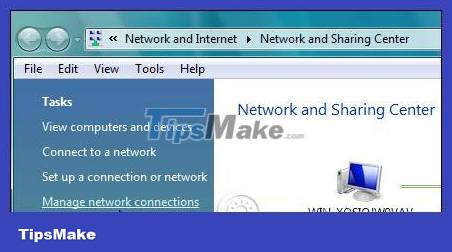
On the Network and Sharing Center window that opens, click Manage network connections.
How to assign a static IP address in Windows 11, 10, 8, 7, XP or Vista Picture 9
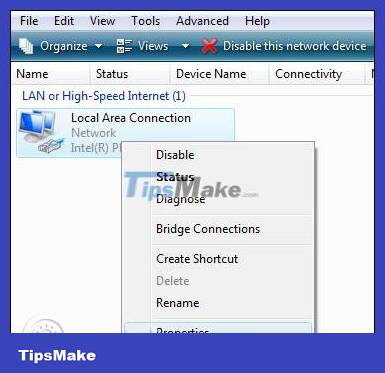
Right-click on the network adapter you want to assign an IP address and click Properties .
How to assign a static IP address in Windows 11, 10, 8, 7, XP or Vista Picture 10
Select Internet Protocol Version 4 (TCP/IPv4) then click the Properties button .
How to assign a static IP address in Windows 11, 10, 8, 7, XP or Vista Picture 11
Now change the IP, Subnet mask, default gateway, and DNS server address, when done click OK .
How to assign a static IP address in Windows 11, 10, 8, 7, XP or Vista Picture 12
You need to close the Local Area Connection Properties window for the settings to take effect.
How to assign a static IP address in Windows 11, 10, 8, 7, XP or Vista Picture 13
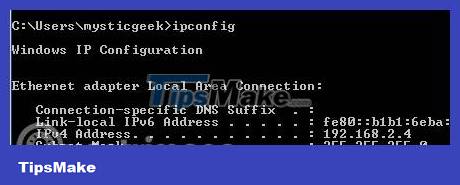
Open Command Prompt and use the ipconfig command to verify the changes were successful.
How to assign a static IP address in Windows 11, 10, 8, 7, XP or Vista Picture 14
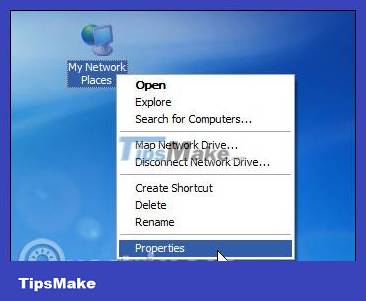
To assign a static IP address in Windows XP, right-click the " My Network Places " icon, then select " Properties ".
How to assign a static IP address in Windows 11, 10, 8, 7, XP or Vista Picture 15
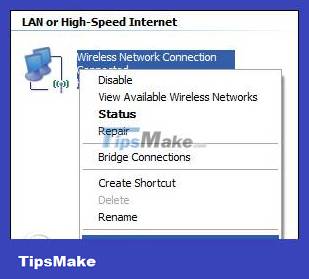
Right-click on the adapter you want to set IP and then select " Properties " from the context menu.
How to assign a static IP address in Windows 11, 10, 8, 7, XP or Vista Picture 16
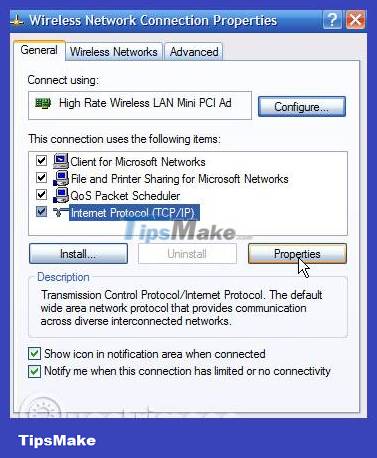
Select the " Internet Protocol (TCP/IP) " item, then click the " Properties " button.
How to assign a static IP address in Windows 11, 10, 8, 7, XP or Vista Picture 17
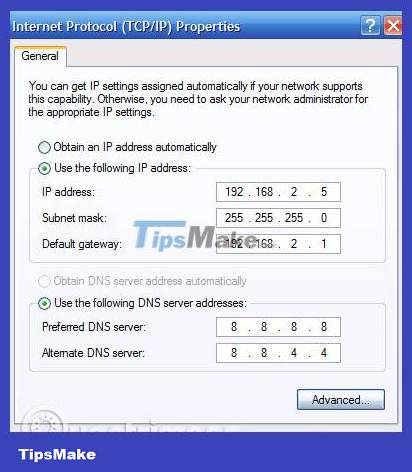
Select the " Use the following IP address " option . Enter the IP address, subnet mask, default gateway and DNS server address you want to use. When done, click the " OK " button.
How to assign a static IP address in Windows 11, 10, 8, 7, XP or Vista Picture 18
You need to close the adapter properties window before the changes take effect.
How to assign a static IP address in Windows 11, 10, 8, 7, XP or Vista Picture 19
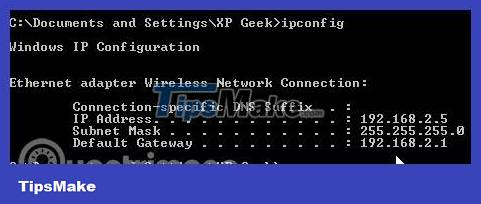
Users can verify the new settings using the ipconfig command in Command Prompt.
How to assign a static IP address in Windows 11, 10, 8, 7, XP or Vista Picture 20
In general, it is best for users to let the router automatically assign IP addresses to devices. Occasionally, you can set a static IP address for a specific device. Although it is possible to set static IP addresses on devices, users should still set up a static IP address on the router if possible.
The above method, using the Settings GUI, is just one of the ways to adjust your IP address settings. For those who prefer to use the command line rather than the GUI, fortunately there are alternatives. For example, you can also use Command Prompt and set the address with just a few commands.
To change your IP address via Command Prompt, follow the steps below:
1. Go to the search bar in the Start menu, enter cmd and launch CMD with admin rights.
2. Enter the following command in CMD and press Enter :
ipconfig /all3. In Ethernet adapter , note the information for the following data:
4. Enter the following command to assign a static IP address on Windows and press Enter :
netsh interface ip set address name= "Ethernet1" static 10.1.4.220 255.255.255.0 10.1.4.1In the command above, replace Ethernet1 with your adapter name and 10.1.4.220 255.255.255.0 10.1.4.1 with the device's IP address, subnet mask and default gateway address corresponding to your network configuration
5. Now, enter the following command to set up the DNS server address and press Enter :
netsh interface ip set dns name= "Ethernet1" static 10.1.4.1
How to assign a static IP address in Windows 11, 10, 8, 7, XP or Vista Picture 21
Your new static IP address will be set up from here.
PowerShell is another tool that is primarily handy for power users, designed to provide more control and management capabilities through task automation. If any of the above methods fail, you can also use PowerShell to set up a static IP address. Here's how you can get started:
1. Go to the search bar in the Start menu, type powershell and run it with admin rights.
2. Enter the following command to view your current network configuration and press Enter :
Get-NetIPConfiguration3. Confirm the following information fields:
4. Enter the following command to set up a static IP address and press Enter :
New-NetIPAddress -InterfaceIndex 10 -IPAddress 10.1.4.119 -PrefixLength 24 -DefaultGateway 10.1.4.15. Here, replace all the values of the information. Replace the InterfaceIndex number (10) with the number specified for your adapter. Similarly, replace IPAddress above with a static IP address you want to set.
6. Finally, enter the following command to assign the DNS server address and press Enter :
Set-DnsClientServerAddress -InterfaceIndex 10 -ServerAddresses 10.1.4.1Again, replace InterfaceIndex number (10) with the corresponding network number. Also, replace ServerAddress with the DNS IP address.
You will have a new static IP address immediately after completing all the above steps.
While DHCP is really great and makes our lives easier, there are situations where using a manually assigned static IP address is quite handy. Let's look at a few scenarios where you want to assign a static IP address to illustrate their benefits.
You need reliable name resolution on your network for computers that need to be found accurately and consistently. Although network protocols have evolved over the years and most of the time use a more abstract protocol like SMB (Server Message Block) to access computers and shared folders on your network using Using the familiar //officecomputer/shared_music/ type address works fine, but for some applications it fails. For example, when setting up media synchronization on XBMC, it is necessary to use the IP address of the media source instead of the SMB name.
Anytime you rely on a computer or a piece of software to accurately and instantly locate another computer on your network (as is the case with the XBMC example - client devices need to find the media server hosting account). data) with the least chance of error, assigning a static IP address is the best way. Direct IP-based resolution remains the most stable and error-free communication method on the network.
You want to impose a human-friendly numbering scheme on your network devices. For network tasks like providing an address for a friend's iPad or your laptop, you probably don't care where the IP comes from in the available block of addresses because you don't really need to know (or care). If you have devices on your network that you frequently access using command-line tools or other IP-oriented applications, assigning fixed addresses to those devices in a child-memory-friendly scheme who can be really helpful.
For example, typically the router will assign any available addresses to 3 Raspberry Pi XBMC units. Because the article author frequently modifies those units and accesses them by their IP addresses, it makes sense to permanently assign logical and memorable addresses to them: